


DeepSeek作为一款高性能的开源大模型,支持多种部署方式。目前很多服务商都支持部署这款大模型,如华为云等。由于DeepSeek对云服务器资源要求较高,所以本文选择的是带GPU的云服务器,本质上就是提供GPU计算资源的弹性云服务器。下文就来详细为大家介绍下在华为云Linux云服务器上部署DeepSeek教程,有需要的朋友可以参考一下。
一、创建华为云弹性云服务器
华为云弹性云服务器是由CPU、内存、操作系统、云硬盘组成的基础的计算组件。弹性云服务器创建成功后,用户就可以像使用自己的本地PC或物理服务器一样,在云上使用弹性云服务器。
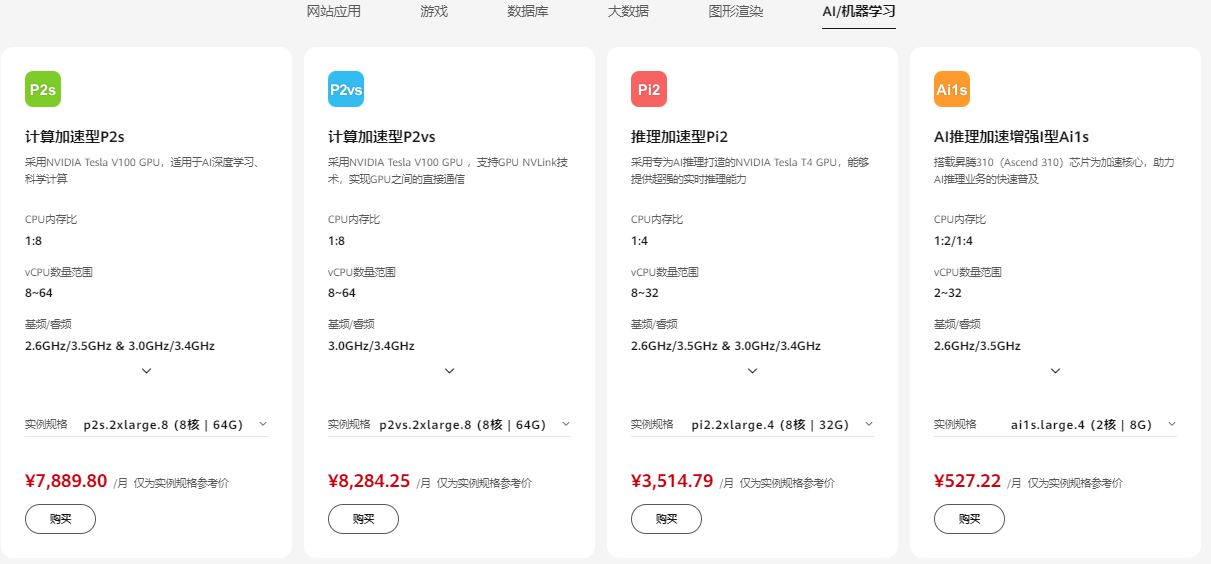
华为云弹性云服务器提供丰富的规格类型,包括通用计算型、通用入门型、内存优化型、高性能计算型、GPU加速型等,其中GPU加速型云服务器能够提供强大的浮点计算能力,从容应对高实时、高并发的海量计算场景。
点击进入:华为云官网
华为云弹性云服务器购买方案推荐
《点击进入官网选购》
1、进入华为云官网,注册华为账号并开通华为云,完成实名认证,并为用户的账号充值。
2、登录控制台,进入购买弹性云服务器页面,本文选择的是GPU加速型实例,如下:
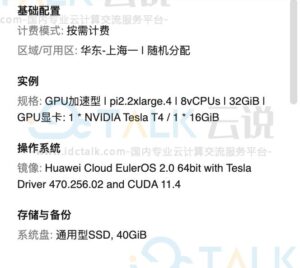
3、设置“基础配置”。

4、设置“实例”。

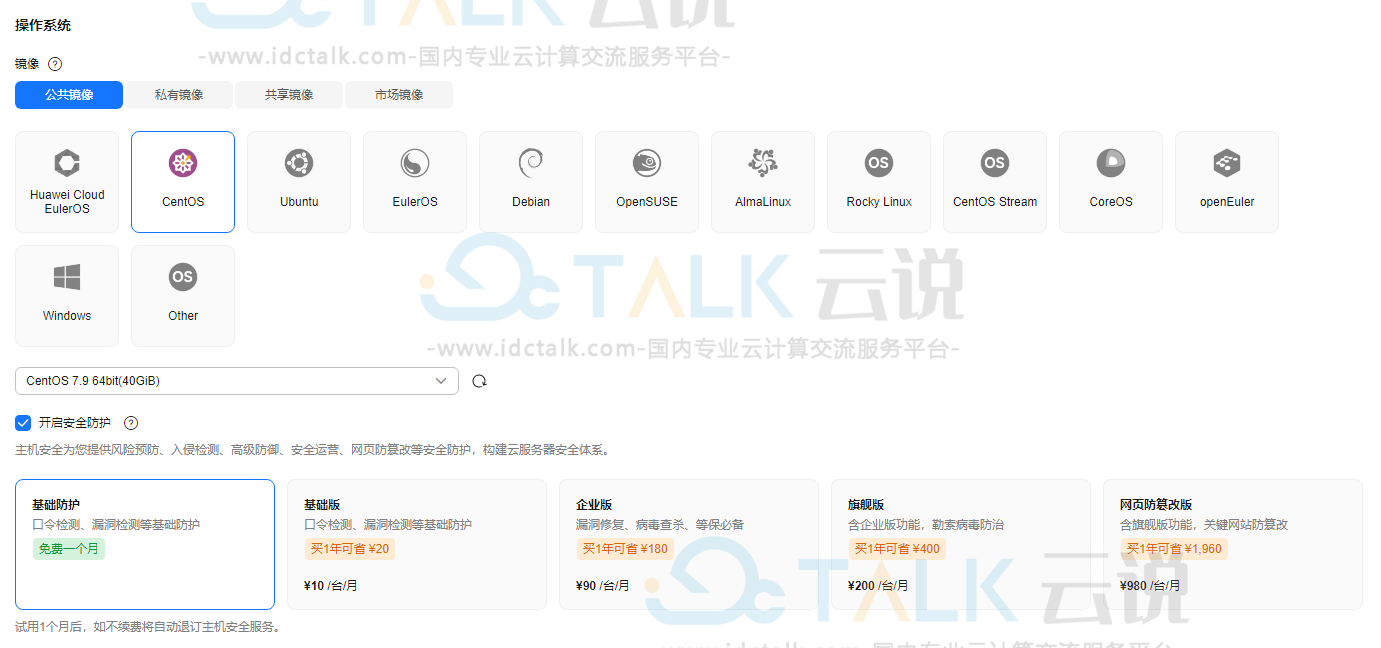
5、设置“操作系统”。
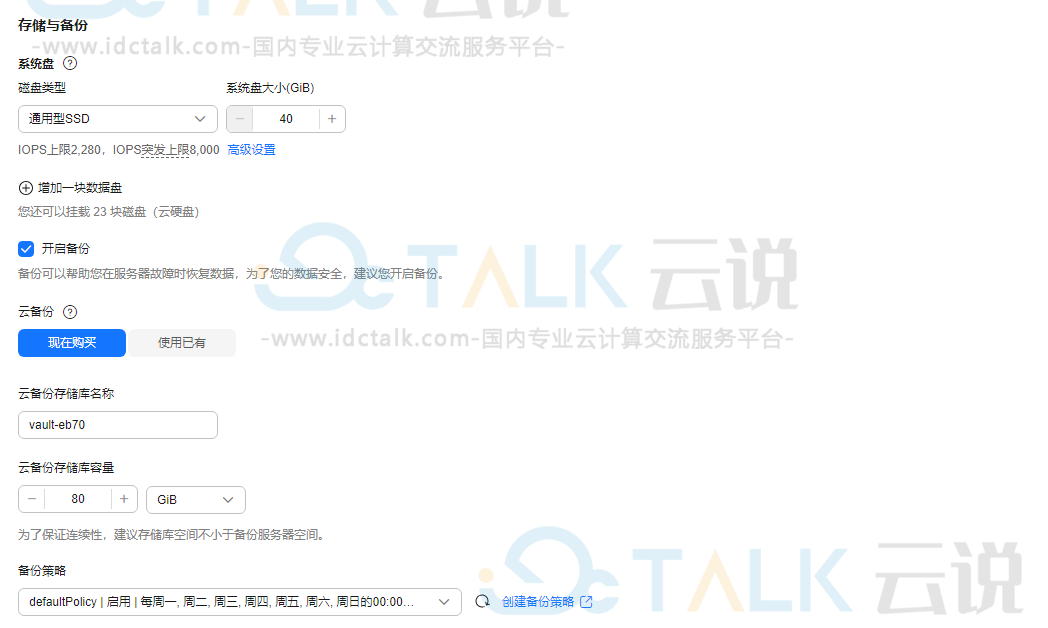
6、设置“存储与备份”。
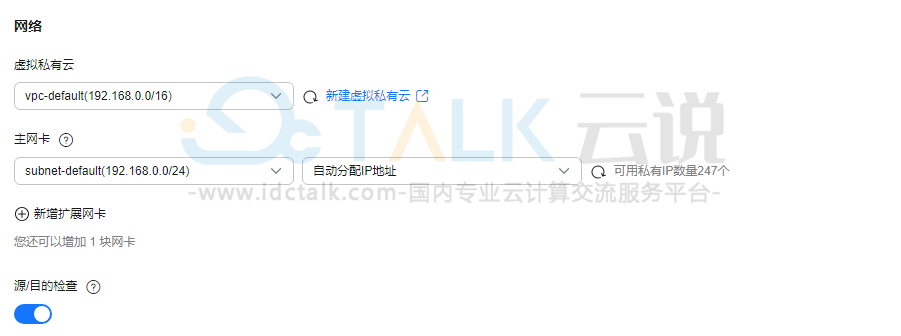
7、设置“网络”。
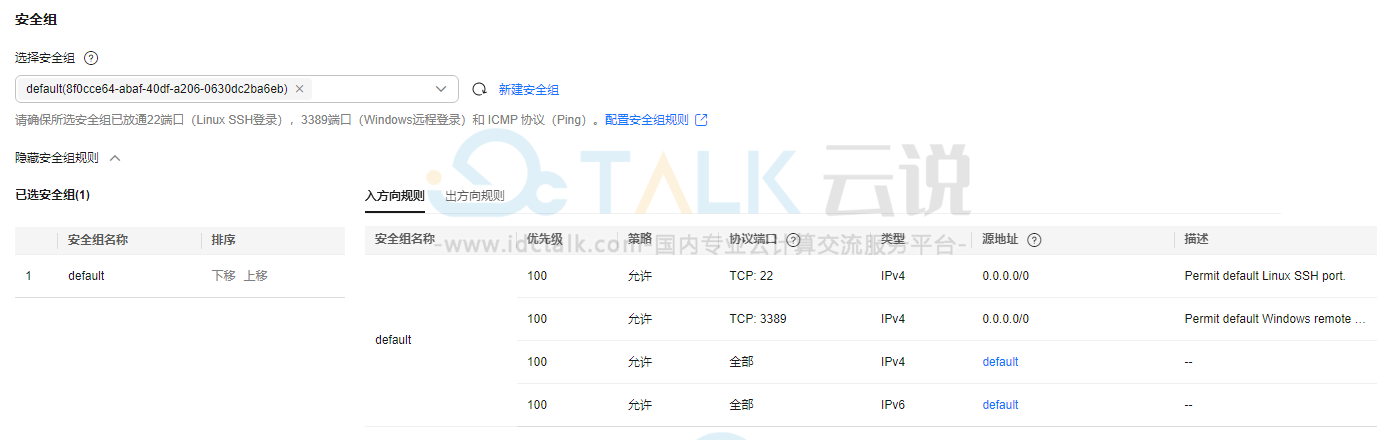
8、设置“安全组”。
9、设置“公网访问”。

10、设置“云服务器管理”。

11、设置“高级配置”。

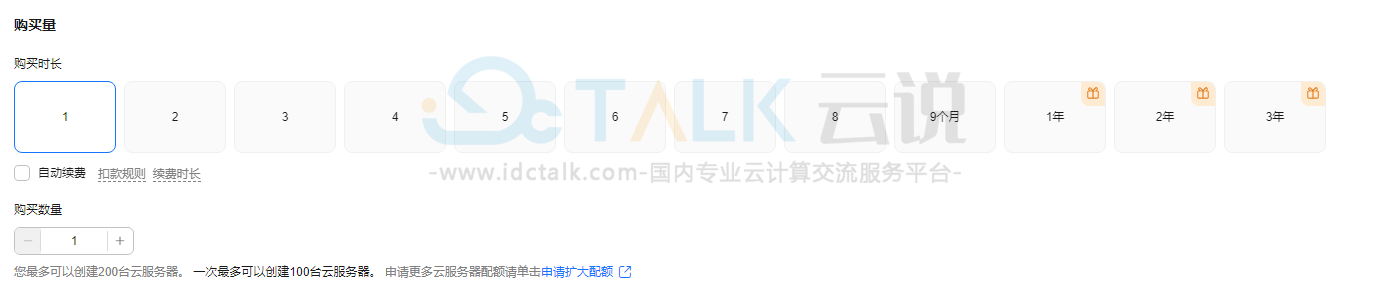
12、设置“购买量”。
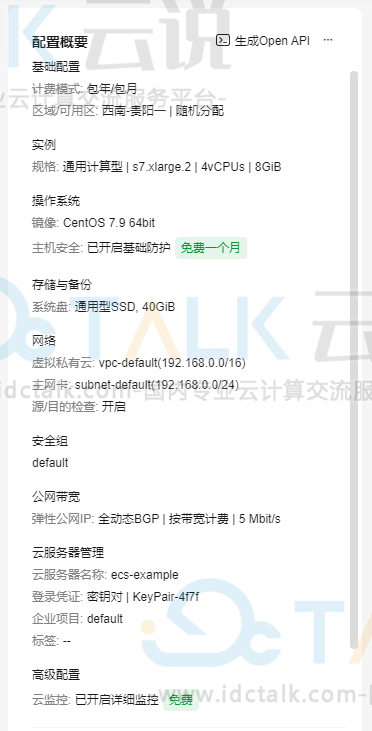
13、在页面右侧的“配置概要”中,确认云服务器配置详情,点击“立即购买”。
14、购买完成华为云弹性云服务器之后,通过EIP公网地址登入到云服务器中。
关于华为云Windows系统云服务器购买,可以参考:《如何购买华为云弹性云服务器呢》
二、部署Ollama
Ollama是一个开源工具,用于在本地轻松运行和部署大型语言模型。
1、下载install.sh文件:
在/root目录下,新建一个install.sh文件,文本编辑器编辑,写入以下内容:
#!/bin/sh
# This script installs Ollama on Linux.
# It detects the current operating system architecture and installs the appropriate version of Ollama.
set -eu
status() { echo ">>> $*" >&2; }
error() { echo "ERROR $*"; exit 1; }
warning() { echo "WARNING: $*"; }
TEMP_DIR=$(mktemp -d)
cleanup() { rm -rf $TEMP_DIR; }
trap cleanup EXIT
available() { command -v $1 >/dev/null; }
require() {
local MISSING=''
for TOOL in $*; do
if ! available $TOOL; then
MISSING="$MISSING $TOOL"
fi
done
echo $MISSING
}
[ "$(uname -s)" = "Linux" ] || error 'This script is intended to run on Linux only.'
ARCH=$(uname -m)
case "$ARCH" in
x86_64) ARCH="amd64" ;;
aarch64|arm64) ARCH="arm64" ;;
*) error "Unsupported architecture: $ARCH" ;;
esac
IS_WSL2=false
KERN=$(uname -r)
case "$KERN" in
*icrosoft*WSL2 | *icrosoft*wsl2) IS_WSL2=true;;
*icrosoft) error "Microsoft WSL1 is not currently supported. Please use WSL2 with 'wsl --set-version 2'" ;;
*) ;;
esac
VER_PARAM="${OLLAMA_VERSION:+?version=$OLLAMA_VERSION}"
SUDO=
if [ "$(id -u)" -ne 0 ]; then
# Running as root, no need for sudo
if ! available sudo; then
error "This script requires superuser permissions. Please re-run as root."
fi
SUDO="sudo"
fi
NEEDS=$(require curl awk grep sed tee xargs)
if [ -n "$NEEDS" ]; then
status "ERROR: The following tools are required but missing:"
for NEED in $NEEDS; do
echo " - $NEED"
done
exit 1
fi
for BINDIR in /usr/local/bin /usr/bin /bin; do
echo $PATH | grep -q $BINDIR && break || continue
done
OLLAMA_INSTALL_DIR=$(dirname ${BINDIR})
status "Installing ollama to $OLLAMA_INSTALL_DIR"
$SUDO install -o0 -g0 -m755 -d $BINDIR
$SUDO install -o0 -g0 -m755 -d "$OLLAMA_INSTALL_DIR"
#if curl -I --silent --fail --location "https://ollama.com/download/ollama-linux-${ARCH}.tgz${VER_PARAM}" >/dev/null ; then
#注释掉以下代码
# status "Downloading Linux ${ARCH} bundle"
# curl --fail --show-error --location --progress-bar \
# "https://ollama.com/download/ollama-linux-${ARCH}.tgz${VER_PARAM}" | \
# $SUDO tar -xzf - -C "$OLLAMA_INSTALL_DIR"
# BUNDLE=1
# if [ "$OLLAMA_INSTALL_DIR/bin/ollama" != "$BINDIR/ollama" ] ; then
# status "Making ollama accessible in the PATH in $BINDIR"
# $SUDO ln -sf "$OLLAMA_INSTALL_DIR/ollama" "$BINDIR/ollama"
# fi
#else
# status "Downloading Linux ${ARCH} CLI"
# curl --fail --show-error --location --progress-bar -o "$TEMP_DIR/ollama"\
# "https://ollama.com/download/ollama-linux-${ARCH}${VER_PARAM}"
# $SUDO install -o0 -g0 -m755 $TEMP_DIR/ollama $OLLAMA_INSTALL_DIR/ollama
# BUNDLE=0
# if [ "$OLLAMA_INSTALL_DIR/ollama" != "$BINDIR/ollama" ] ; then
# status "Making ollama accessible in the PATH in $BINDIR"
# $SUDO ln -sf "$OLLAMA_INSTALL_DIR/ollama" "$BINDIR/ollama"
# fi
#fi
#新增以下代码
LOCAL_OLLAMA_TGZ="./ollama-linux-${ARCH}.tgz${VER_PARAM}"
if [ -f "$LOCAL_OLLAMA_TGZ" ]; then
status "Installing from local file $LOCAL_OLLAMA_TGZ"
$SUDO tar -xzf "$LOCAL_OLLAMA_TGZ" -C "$OLLAMA_INSTALL_DIR"
BUNDLE=1
if [ ! -e "$BINDIR/ollama" ]; then
status "Making ollama accessible in the PATH in $BINDIR"
$SUDO ln -sf "$OLLAMA_INSTALL_DIR/ollama" "$BINDIR/ollama"
fi
else
echo "Error: The local file $LOCAL_OLLAMA_TGZ does not exist."
exit 1
fi
install_success() {
status 'The Ollama API is now available at 127.0.0.1:11434.'
status 'Install complete. Run "ollama" from the command line.'
}
trap install_success EXIT
# Everything from this point onwards is optional.
configure_systemd() {
if ! id ollama >/dev/null 2>&1; then
status "Creating ollama user..."
$SUDO useradd -r -s /bin/false -U -m -d /usr/share/ollama ollama
fi
if getent group render >/dev/null 2>&1; then
status "Adding ollama user to render group..."
$SUDO usermod -a -G render ollama
fi
if getent group video >/dev/null 2>&1; then
status "Adding ollama user to video group..."
$SUDO usermod -a -G video ollama
fi
status "Adding current user to ollama group..."
$SUDO usermod -a -G ollama $(whoami)
status "Creating ollama systemd service..."
cat </dev/null
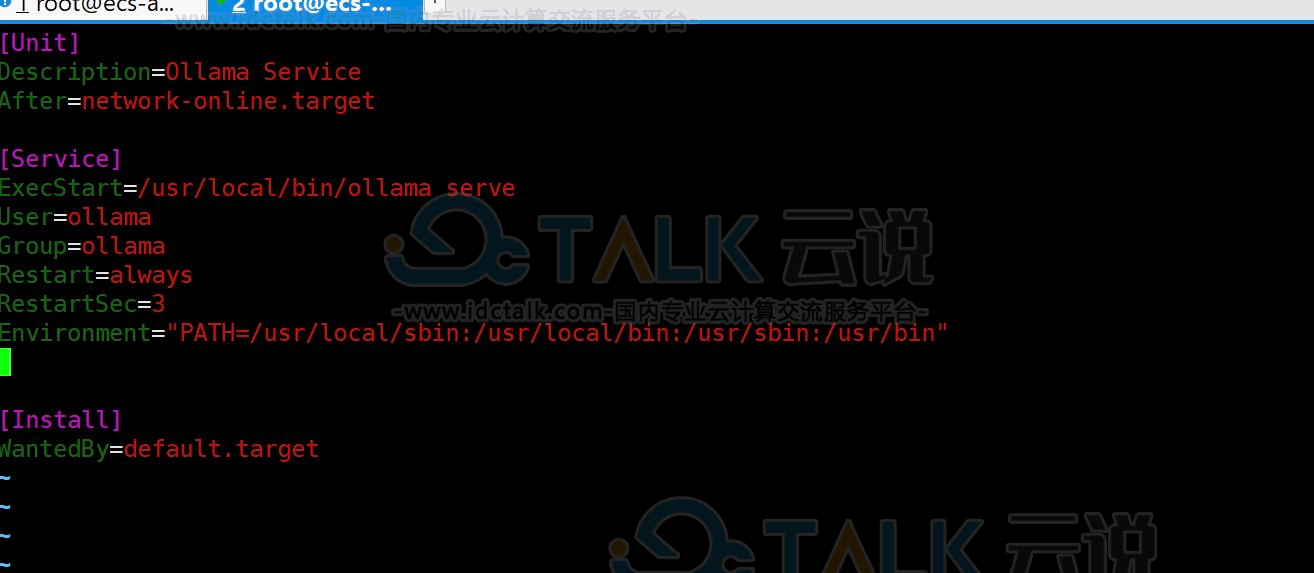
[Unit]
Description=Ollama Service
After=network-online.target
[Service]
ExecStart=$BINDIR/ollama serve
User=ollama
Group=ollama
Restart=always
RestartSec=3
Environment="PATH=$PATH"
[Install]
WantedBy=default.target
EOF
SYSTEMCTL_RUNNING="$(systemctl is-system-running || true)"
case $SYSTEMCTL_RUNNING in
running|degraded)
status "Enabling and starting ollama service..."
$SUDO systemctl daemon-reload
$SUDO systemctl enable ollama
start_service() { $SUDO systemctl restart ollama; }
trap start_service EXIT
;;
esac
}
if available systemctl; then
configure_systemd
fi
# WSL2 only supports GPUs via nvidia passthrough
# so check for nvidia-smi to determine if GPU is available
if [ "$IS_WSL2" = true ]; then
if available nvidia-smi && [ -n "$(nvidia-smi | grep -o "CUDA Version: [0-9]*\.[0-9]*")" ]; then
status "Nvidia GPU detected."
fi
install_success
exit 0
fi
# Install GPU dependencies on Linux
if ! available lspci && ! available lshw; then
warning "Unable to detect NVIDIA/AMD GPU. Install lspci or lshw to automatically detect and install GPU dependencies."
exit 0
fi
check_gpu() {
# Look for devices based on vendor ID for NVIDIA and AMD
case $1 in
lspci)
case $2 in
nvidia) available lspci && lspci -d '10de:' | grep -q 'NVIDIA' || return 1 ;;
amdgpu) available lspci && lspci -d '1002:' | grep -q 'AMD' || return 1 ;;
esac ;;
lshw)
case $2 in
nvidia) available lshw && $SUDO lshw -c display -numeric -disable network | grep -q 'vendor: .* \[10DE\]' || return 1 ;;
amdgpu) available lshw && $SUDO lshw -c display -numeric -disable network | grep -q 'vendor: .* \[1002\]' || return 1 ;;
esac ;;
nvidia-smi) available nvidia-smi || return 1 ;;
esac
}
if check_gpu nvidia-smi; then
status "NVIDIA GPU installed."
exit 0
fi
if ! check_gpu lspci nvidia && ! check_gpu lshw nvidia && ! check_gpu lspci amdgpu && ! check_gpu lshw amdgpu; then
install_success
warning "No NVIDIA/AMD GPU detected. Ollama will run in CPU-only mode."
exit 0
fi
if check_gpu lspci amdgpu || check_gpu lshw amdgpu; then
if [ $BUNDLE -ne 0 ]; then
status "Downloading Linux ROCm ${ARCH} bundle"
curl --fail --show-error --location --progress-bar \
"https://ollama.com/download/ollama-linux-${ARCH}-rocm.tgz${VER_PARAM}" | \
$SUDO tar -xzf - -C "$OLLAMA_INSTALL_DIR"
install_success
status "AMD GPU ready."
exit 0
fi
# Look for pre-existing ROCm v6 before downloading the dependencies
for search in "${HIP_PATH:-''}" "${ROCM_PATH:-''}" "/opt/rocm" "/usr/lib64"; do
if [ -n "${search}" ] && [ -e "${search}/libhipblas.so.2" -o -e "${search}/lib/libhipblas.so.2" ]; then
status "Compatible AMD GPU ROCm library detected at ${search}"
install_success
exit 0
fi
done
status "Downloading AMD GPU dependencies..."
$SUDO rm -rf /usr/share/ollama/lib
$SUDO chmod o+x /usr/share/ollama
$SUDO install -o ollama -g ollama -m 755 -d /usr/share/ollama/lib/rocm
curl --fail --show-error --location --progress-bar "https://ollama.com/download/ollama-linux-amd64-rocm.tgz${VER_PARAM}" \
| $SUDO tar zx --owner ollama --group ollama -C /usr/share/ollama/lib/rocm .
install_success
status "AMD GPU ready."
exit 0
fi
CUDA_REPO_ERR_MSG="NVIDIA GPU detected, but your OS and Architecture are not supported by NVIDIA. Please install the CUDA driver manually https://docs.nvidia.com/cuda/cuda-installation-guide-linux/"
# ref: https://docs.nvidia.com/cuda/cuda-installation-guide-linux/index.html#rhel-7-centos-7
# ref: https://docs.nvidia.com/cuda/cuda-installation-guide-linux/index.html#rhel-8-rocky-8
# ref: https://docs.nvidia.com/cuda/cuda-installation-guide-linux/index.html#rhel-9-rocky-9
# ref: https://docs.nvidia.com/cuda/cuda-installation-guide-linux/index.html#fedora
install_cuda_driver_yum() {
status 'Installing NVIDIA repository...'
case $PACKAGE_MANAGER in
yum)
$SUDO $PACKAGE_MANAGER -y install yum-utils
if curl -I --silent --fail --location "https://developer.download.nvidia.com/compute/cuda/repos/$1$2/$(uname -m | sed -e 's/aarch64/sbsa/')/cuda-$1$2.repo" >/dev/null ; then
$SUDO $PACKAGE_MANAGER-config-manager --add-repo https://developer.download.nvidia.com/compute/cuda/repos/$1$2/$(uname -m | sed -e 's/aarch64/sbsa/')/cuda-$1$2.repo
else
error $CUDA_REPO_ERR_MSG
fi
;;
dnf)
if curl -I --silent --fail --location "https://developer.download.nvidia.com/compute/cuda/repos/$1$2/$(uname -m | sed -e 's/aarch64/sbsa/')/cuda-$1$2.repo" >/dev/null ; then
$SUDO $PACKAGE_MANAGER config-manager --add-repo https://developer.download.nvidia.com/compute/cuda/repos/$1$2/$(uname -m | sed -e 's/aarch64/sbsa/')/cuda-$1$2.repo
else
error $CUDA_REPO_ERR_MSG
fi
;;
esac
case $1 in
rhel)
status 'Installing EPEL repository...'
# EPEL is required for third-party dependencies such as dkms and libvdpau
$SUDO $PACKAGE_MANAGER -y install https://dl.fedoraproject.org/pub/epel/epel-release-latest-$2.noarch.rpm || true
;;
esac
status 'Installing CUDA driver...'
if [ "$1" = 'centos' ] || [ "$1$2" = 'rhel7' ]; then
$SUDO $PACKAGE_MANAGER -y install nvidia-driver-latest-dkms
fi
$SUDO $PACKAGE_MANAGER -y install cuda-drivers
}
# ref: https://docs.nvidia.com/cuda/cuda-installation-guide-linux/index.html#ubuntu
# ref: https://docs.nvidia.com/cuda/cuda-installation-guide-linux/index.html#debian
install_cuda_driver_apt() {
status 'Installing NVIDIA repository...'
if curl -I --silent --fail --location "https://developer.download.nvidia.com/compute/cuda/repos/$1$2/$(uname -m | sed -e 's/aarch64/sbsa/')/cuda-keyring_1.1-1_all.deb" >/dev/null ; then
curl -fsSL -o $TEMP_DIR/cuda-keyring.deb https://developer.download.nvidia.com/compute/cuda/repos/$1$2/$(uname -m | sed -e 's/aarch64/sbsa/')/cuda-keyring_1.1-1_all.deb
else
error $CUDA_REPO_ERR_MSG
fi
case $1 in
debian)
status 'Enabling contrib sources...'
$SUDO sed 's/main/contrib/' < /etc/apt/sources.list | $SUDO tee /etc/apt/sources.list.d/contrib.list > /dev/null
if [ -f "/etc/apt/sources.list.d/debian.sources" ]; then
$SUDO sed 's/main/contrib/' < /etc/apt/sources.list.d/debian.sources | $SUDO tee /etc/apt/sources.list.d/contrib.sources > /dev/null
fi
;;
esac
status 'Installing CUDA driver...'
$SUDO dpkg -i $TEMP_DIR/cuda-keyring.deb
$SUDO apt-get update
[ -n "$SUDO" ] && SUDO_E="$SUDO -E" || SUDO_E=
DEBIAN_FRONTEND=noninteractive $SUDO_E apt-get -y install cuda-drivers -q
}
if [ ! -f "/etc/os-release" ]; then
error "Unknown distribution. Skipping CUDA installation."
fi
. /etc/os-release
OS_NAME=$ID
OS_VERSION=$VERSION_ID
PACKAGE_MANAGER=
for PACKAGE_MANAGER in dnf yum apt-get; do
if available $PACKAGE_MANAGER; then
break
fi
done
if [ -z "$PACKAGE_MANAGER" ]; then
error "Unknown package manager. Skipping CUDA installation."
fi
if ! check_gpu nvidia-smi || [ -z "$(nvidia-smi | grep -o "CUDA Version: [0-9]*\.[0-9]*")" ]; then
case $OS_NAME in
centos|rhel) install_cuda_driver_yum 'rhel' $(echo $OS_VERSION | cut -d '.' -f 1) ;;
rocky) install_cuda_driver_yum 'rhel' $(echo $OS_VERSION | cut -c1) ;;
fedora) [ $OS_VERSION -lt '39' ] && install_cuda_driver_yum $OS_NAME $OS_VERSION || install_cuda_driver_yum $OS_NAME '39';;
amzn) install_cuda_driver_yum 'fedora' '37' ;;
debian) install_cuda_driver_apt $OS_NAME $OS_VERSION ;;
ubuntu) install_cuda_driver_apt $OS_NAME $(echo $OS_VERSION | sed 's/\.//') ;;
*) exit ;;
esac
fi
if ! lsmod | grep -q nvidia || ! lsmod | grep -q nvidia_uvm; then
KERNEL_RELEASE="$(uname -r)"
case $OS_NAME in
rocky) $SUDO $PACKAGE_MANAGER -y install kernel-devel kernel-headers ;;
centos|rhel|amzn) $SUDO $PACKAGE_MANAGER -y install kernel-devel-$KERNEL_RELEASE kernel-headers-$KERNEL_RELEASE ;;
fedora) $SUDO $PACKAGE_MANAGER -y install kernel-devel-$KERNEL_RELEASE ;;
debian|ubuntu) $SUDO apt-get -y install linux-headers-$KERNEL_RELEASE ;;
*) exit ;;
esac
NVIDIA_CUDA_VERSION=$($SUDO dkms status | awk -F: '/added/ { print $1 }')
if [ -n "$NVIDIA_CUDA_VERSION" ]; then
$SUDO dkms install $NVIDIA_CUDA_VERSION
fi
if lsmod | grep -q nouveau; then
status 'Reboot to complete NVIDIA CUDA driver install.'
exit 0
fi
$SUDO modprobe nvidia
$SUDO modprobe nvidia_uvm
fi
# make sure the NVIDIA modules are loaded on boot with nvidia-persistenced
if available nvidia-persistenced; then
$SUDO touch /etc/modules-load.d/nvidia.conf
MODULES="nvidia nvidia-uvm"
for MODULE in $MODULES; do
if ! grep -qxF "$MODULE" /etc/modules-load.d/nvidia.conf; then
echo "$MODULE" | $SUDO tee -a /etc/modules-load.d/nvidia.conf > /dev/null
fi
done
fi
status "NVIDIA GPU ready."
install_success注:安装脚本不需要做任何的改动,包括软件的安装,服务配置,环境变量配置,开机自启动等相关操作。
2、下载Ollama安装包,下载地址(https://ollama.com/download/ollama-linux-amd64.tgz)。
这里在云服务器上直接下载即可,这里需要对EIP带宽有一定要求,最好是设置为300M带宽,按照流量进行计费。
# wget https://ollama.com/download/ollama-linux-amd64.tgz配置install.sh脚本与Ollama安装包下载完成之后,如下:
[root@ecs-a2c5 ~]# ll
total 1642992
-rwxr-xr-x 1 root root      13932 Feb  7 16:38 install.sh
-rw-r--r-- 1 root root 1682401421 Feb 11 16:20 ollama-linux-amd64.tgz
3、安装Ollama服务:
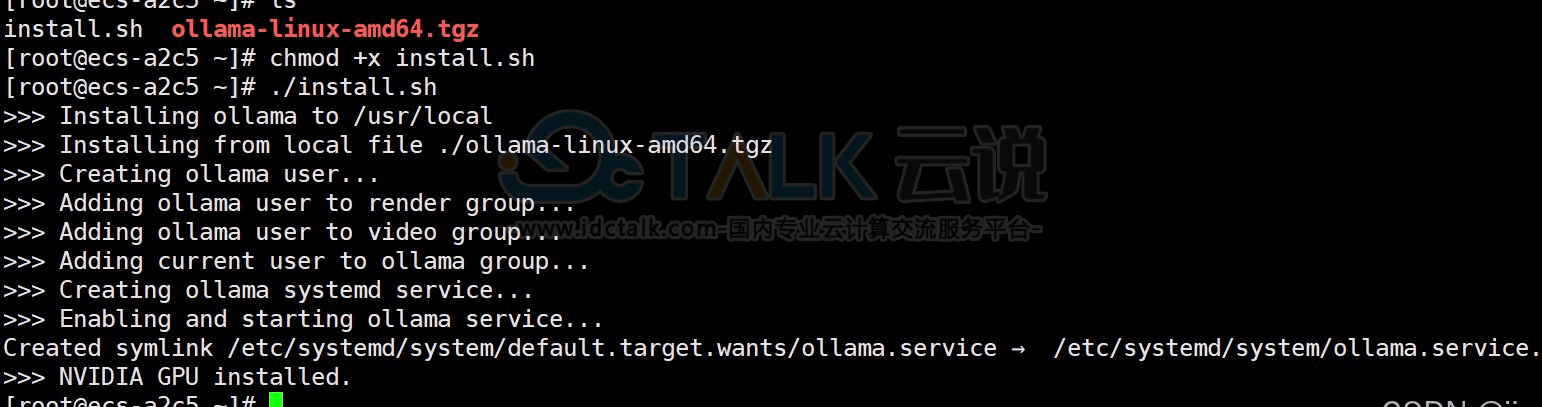
先将install.sh添加可执行权限,然后执行安装。
# chmod +x install.sh
# ./install.sh
结果如下:
验证安装:
安装完成后,在终端输入以下命令,检查Ollama版本。

4、配置Ollama服务:
有一些环境变量需要配置,如监听host、下载路径(因为是离线,用处不大)、多CUDA使用。
注:CUDA是由NVIDIA开发的一种并行计算平台和编程模型,它允许开发者使用NVIDIA的GPU进行通用计算任务。
# vim /etc/systemd/system/ollama.service修改前的参数配置:
修改后的参数配置:
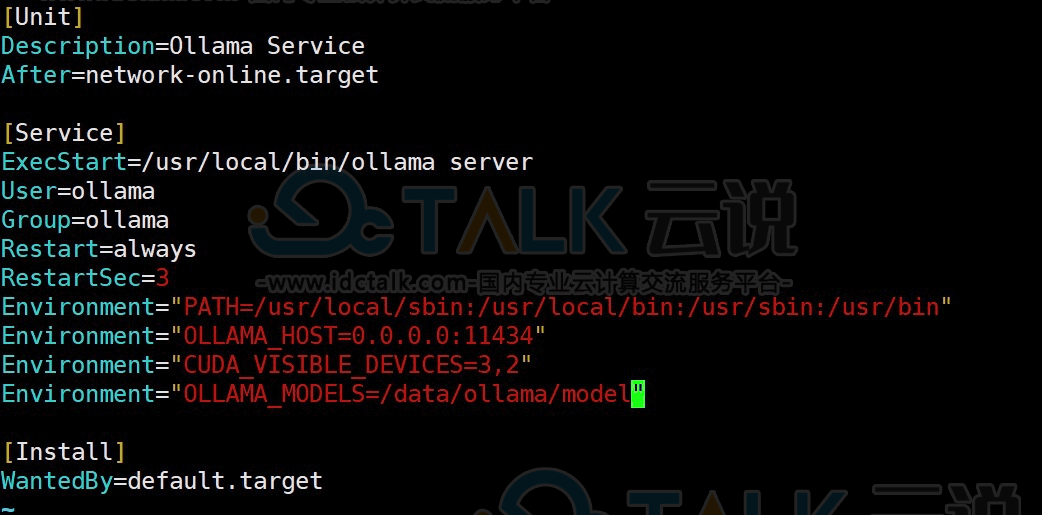
添加的参数内容如下:
Environment="OLLAMA_HOST=0.0.0.0:11434"
Environment="CUDA_VISIBLE_DEVICES=3,2"
Environment="OLLAMA_MODELS=/data/ollama/model"
生效配置:
# systemctl daemon-reload
# systemctl restart ollama
注:这里会出现一个问题,如果不给OLLAMA_MODELS的文件夹777权限,启动可能可能会失败。
# mkdir -p /data/ollama/model

# chmod 777 /data/ollama/model
三、下载DeepSeek模型
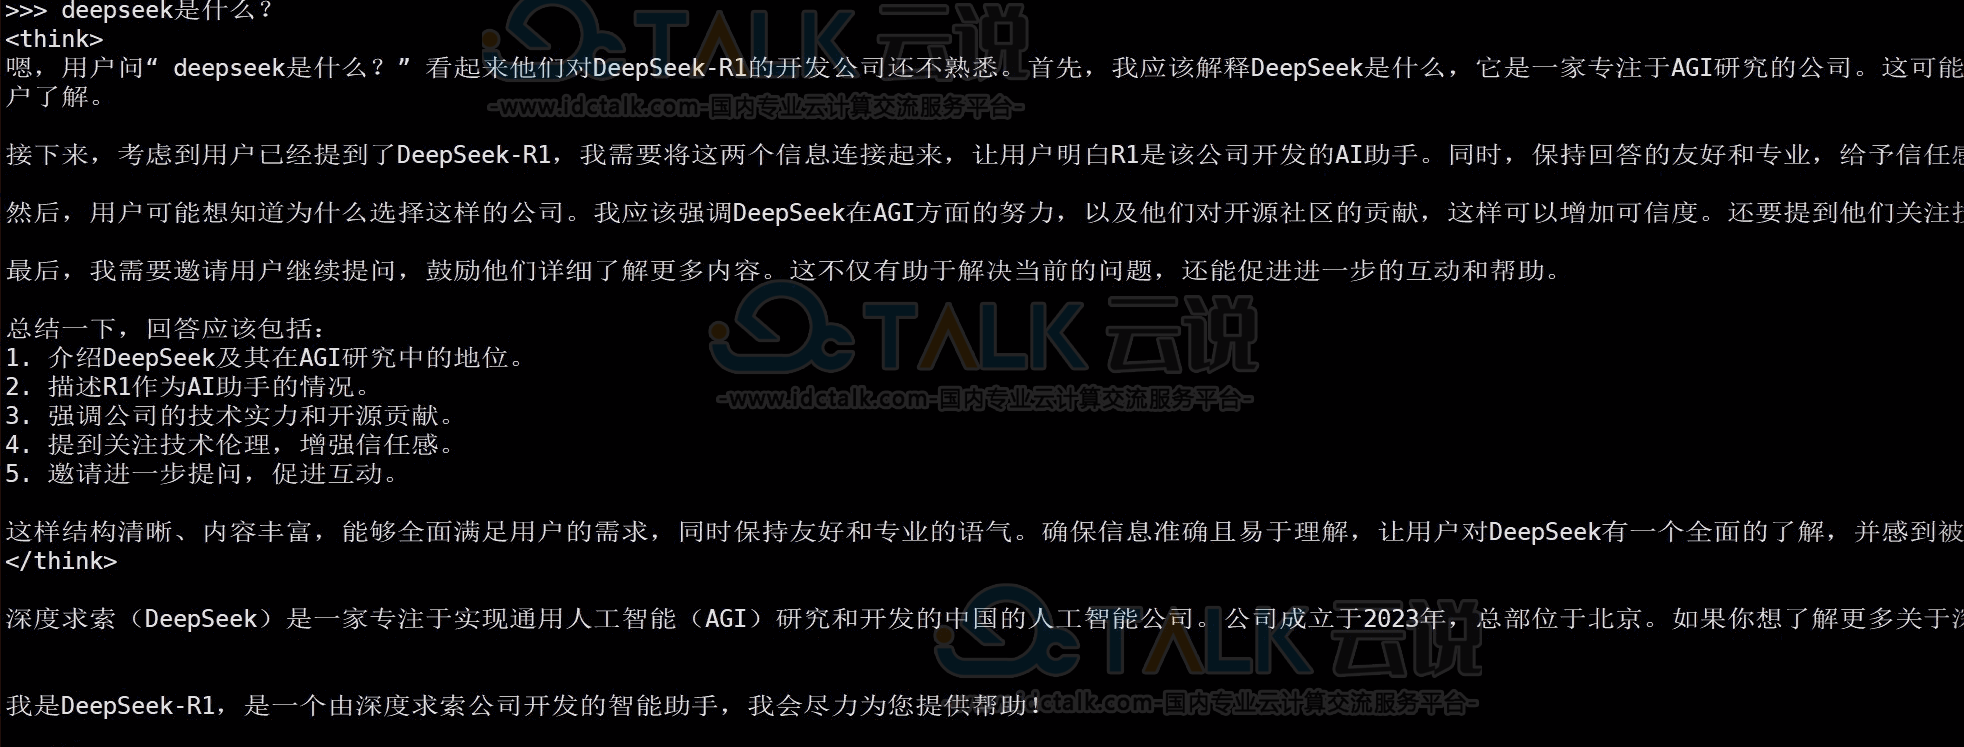
Ollama支持多种DeepSeek模型版本,用户可以根据硬件配置选择合适的模型。
DeepSeek是杭州深度求索人工智能基础技术研究有限公司推出的AI助手,免费体验与全球领先AI模型的互动交流,于2025年1月15日正式上线。
选择模型版本:
- 入门级:1.5B版本,适合初步测试。
- 中端:7B或8B版本,适合大多数消费级GPU。
- 高性能:14B、32B或70B版本,适合高端GPU。
下载deepseek模型命令如下:
7B版本:

# ollama run deepseek-r1:7b

8B版本:

# ollama run deepseek-r1:8b

14B版本:

# ollama run deepseek-r1:14b

32B版本:

# ollama run deepseek-r1:32b
这里下载的是8b版本的
[root@ecs-a2c5 ~]# ollama run deepseek-r1:8b
.......
>>> Send a message (/? for help)
验证一下DeepSeek模型效果:
1、在终端运行以下命令启动Ollama服务:
ollama serve查看Ollama服务进程:
[root@ecs-a2c5 docker]# netstat -anlp | grep ollama
tcp 0 0 127.0.0.1:36351 0.0.0.0:* LISTEN 10052/ollama_llama_
tcp6 0 0 :::11434 :::* LISTEN 8765/ollama
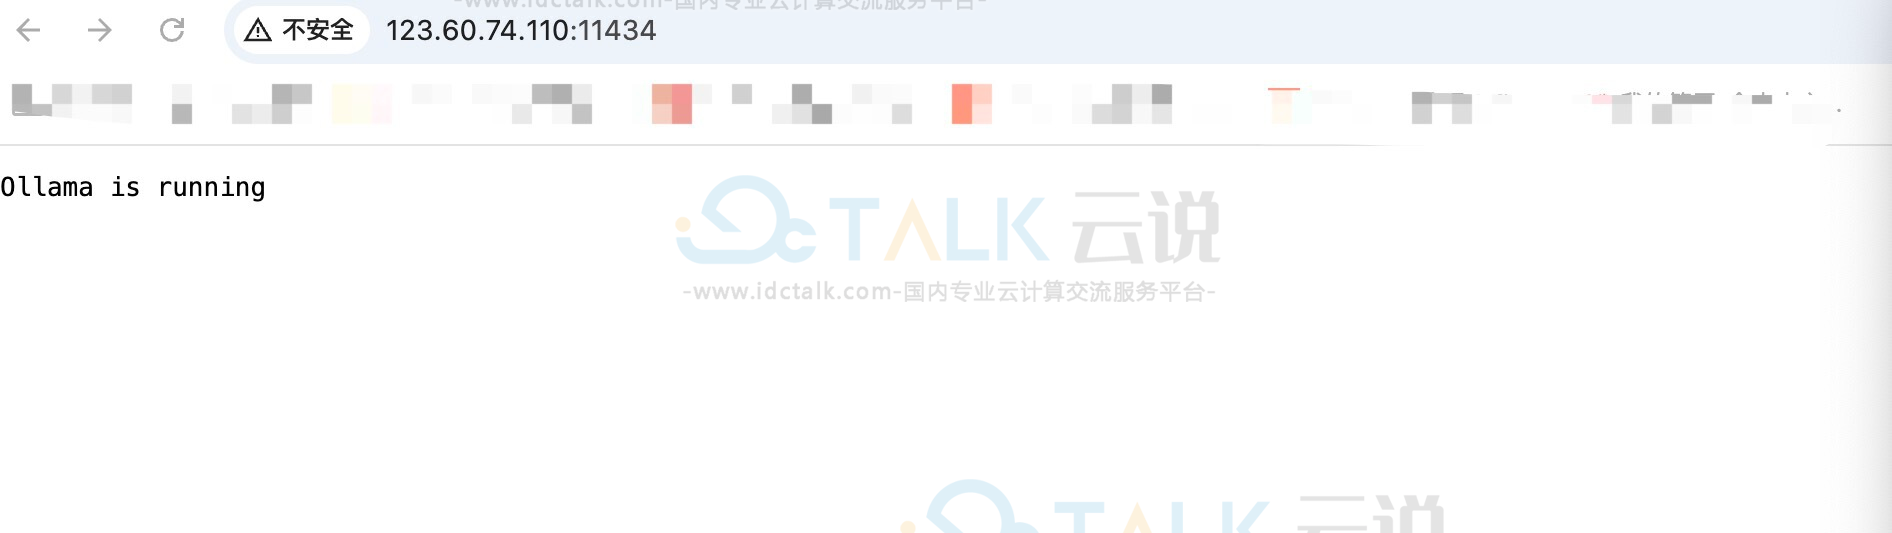
unix 3 [ ] STREAM CONNECTED 91957 8765/ollama 2、打开浏览器,访问http://localhost:11434,如果页面显示Ollama的界面,则说明安装成功。
四、安装MaxKB问答系统
MaxKB是一款基于大语言模型(LLM)和检索增强生成(RAG)技术的开源知识库问答系统。
1、安装docker服务
yum install-y docker
systemctl restart docker
2、下载MaxKB容器镜像
# docker pull registry.cn-hangzhou.aliyuncs.com/images-speed-up/maxkb:latest运行本地MaxKB容器服务
[root@ecs-a2c5 docker]# docker images
REPOSITORY                                                TAG                 IMAGE ID            CREATED             SIZE
registry.cn-hangzhou.aliyuncs.com/images-speed-up/maxkb   latest              56b459f9befb        25 hours ago        3.6GB
[root@ecs-a2c5 docker]# docker run -d --name=maxkb -p 8080:8080 -v /maxkb_data:/var/lib/postgresql/data registry.cn-hangzhou.aliyuncs.com/images-speed-up/maxkb:latest
ee1696017832dc7490537b709a47a2cb9db07d053b24f27f4ed3d010069144d2
[root@ecs-a2c5 docker]# docker ps
CONTAINER ID        IMAGE                                                            COMMAND                  CREATED             STATUS              PORTS                              NAMES
ee1696017832        registry.cn-hangzhou.aliyuncs.com/images-speed-up/maxkb:latest   "bash -c /usr/bin/ru…"   6 seconds ago       Up 5 seconds        5432/tcp, 0.0.0.0:8080->8080/tcp   maxkb
3、访问MAXKB问答系统
https://eip:8080/ui/login

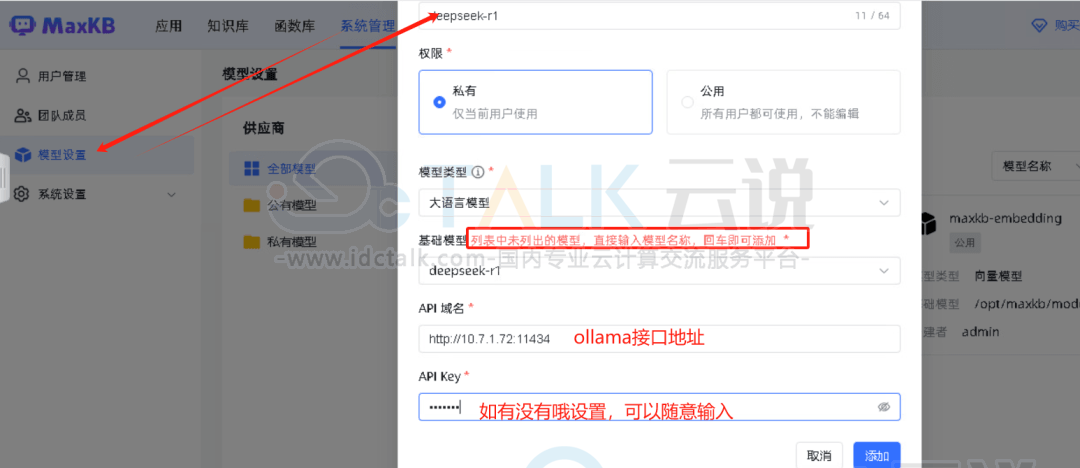
a.进入MaxKB控制台:模型管理 > 添加模型
b.填写参数:
模型类型:Ollama
模型名称:DeepSeek-r1
Base URL:http://ollama主机ip:11434(Docker内访问宿主机)
模型名称:deepseek-r1(与Ollama拉取的模型名一致)
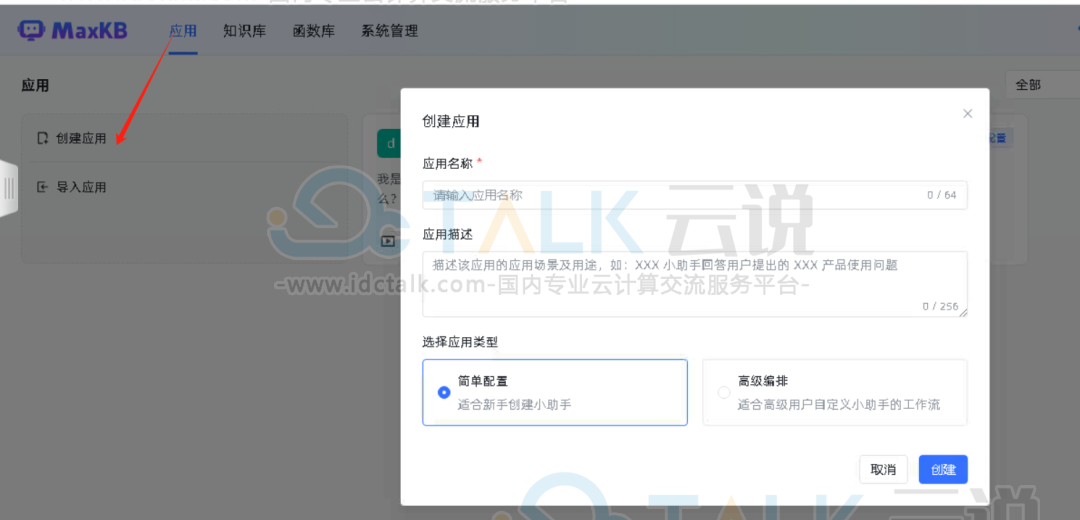
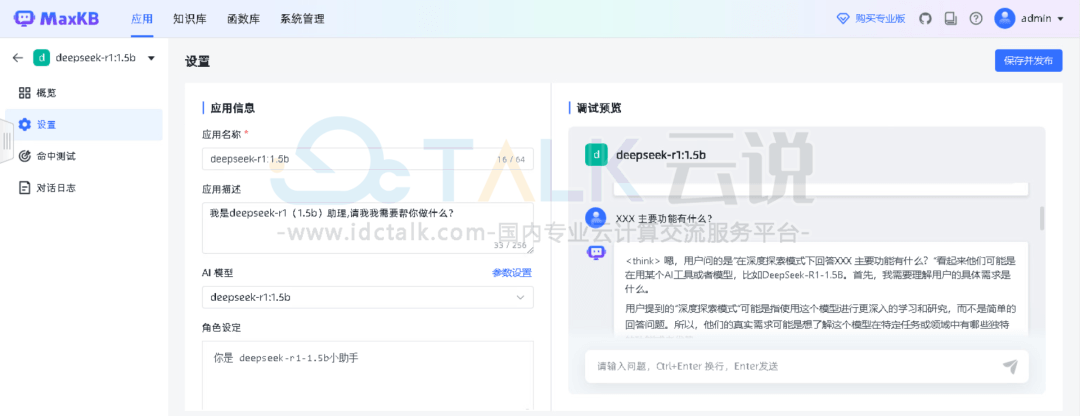
4、创建应用并测试问答功能
相关推荐:


